Nameplates are often missing or damaged on TMC gear. This page provides information that you may be able to use to reproduce and replace theses tags.
Refer to the NP Drawings for TMC's original drawings of equipment nametags. Unfortunately, many of these drawings are missing, but the nametags only came in a few standard sizes.
There are three ways for you to obtain a reproduction equipment tag:
There are a couple of ways to reproduce TMC equipment ID tags that have been tried.
If you happen to have a very clean copy of an original tag, method 1. works reasonably well. Bruce Berman, for example, borrowed an RTC tag from me and shipped the original tag to Aluma Photoplate (see below) to have it copied. The copies look pretty decent, but on close inspection, they're a little 'noisy'. They're not bad at all, however, good enough to satisfy Bruce, who's a pretty demanding restorer. If you need an RTC tag, get in touch with Bruce!
This led me to explore option 2. I'm currently (6/27/2015) in the process of having Aluma Photoplate make a complete set of tags for the PAL-1K. I'll update this page with the results in about a month, when Aluma ships me the new tags. I've made 'way more than I need! The surplus will be for sale shortly, probably priced around $10 or so per tag. See this space for details. I'm also planning to have some RTM (GPT-750 AM Modulator) tags fabricated, and those will also be available for purchase.
You can see the progress of the artwork design by clicking on Tag Design Database Page.
This section describes a process you could use to create your own replacement TMC equipment tag.
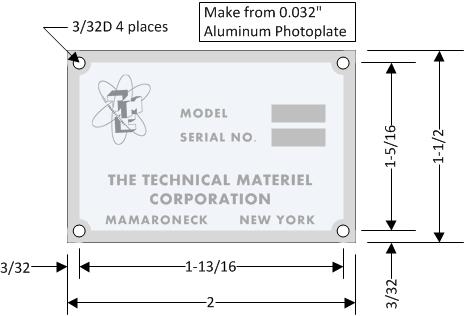
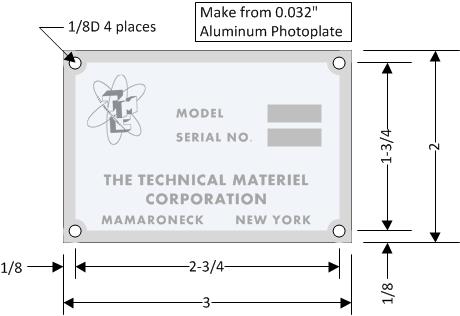
The first step is to figure out the exact size and mounting-hole placement for the tag you want to reproduce. Below are a couple of drawings for two fairly typical tag sizes: 1.5" x 2" and 2" x 3".
 |
 |
|
| 1-1/2" x 2" Nameplates | 2" x 3" Nameplates |
If the plate you're trying to reproduce is a different size and shape from these, then your first step will be to create a drawing, like these, that specifies the overall dimensions, the hole locations and sizes, tag thickness, and any other salient features, such as corner radiuses. You may be able to find the drawing for the tag you're trying to make in the NP Drawing repository, though many of the earlier tag drawings are missing.
The next step is creating the digital artwork for the tag. In addition to the geometric features (borders, radiuses around holes, blank areas for serial no. stamps, and so forth), you'll need to items that are more difficult to find. Fortunately, I've already done most of the work!
Below are scans of the company logos (good for cups, t-shirts, and such.. :), as well as nametag artwork. For TMC's early equipment, the "Fat", cleaned-up, and photoreversed logo at the top right of the table is mostly what you'll need. For later equipment, the "late" logo will be needed, and the left-most item, 2nd row, would be a good starting point.
| Early Logo | Early Logo, from drawing NP-117 | "Fat" and cleaned-up version of NP-117 for nameplates | "Fat", cleaned-up, photoreversed version of NP-117 for nameplates |
| Late Logo | Late Logo (grayscale) | Early Logo (Blue) | |
The "old" logo was scanned at high resolution from the original drawing, NP-117, which is referenced in various other NP tag designs. I used the excellent free photo processing tool "Gimp" to do the cleaning and photo-reversal. Gimp is an excellent example of Poulton's Rule for Design Tools: "The value of a design tool is inversely proportional to its price!" You can dowload gimp from
http://www.gimp.org/downloads/
If you are going to be doing your artwork on a PC, and just want to get on with it, down-load the font "Perspective Sans" from the website:
This is an "OTF" font; to use it with Visio on a PC, you'll need to covert it to "TrueType" (TTF), which you can do for free at:
https://everythingfonts.com/otf-to-ttf
Then skip to the next section.
If you want to read about the nitty-gritty of finding a suitable font, or you're not completely happy with the choice of Perspective Sans, read on!
The first order of business is to find a digital font that approximates the lettering TMC used on its early tags. If you have a later production unit, you may find that TMC used a more standard-looking sans-serif font, and that may be much easier to match with commonly available existing digital fonts.
Below is a scan of a typical early TMC equipment tag
: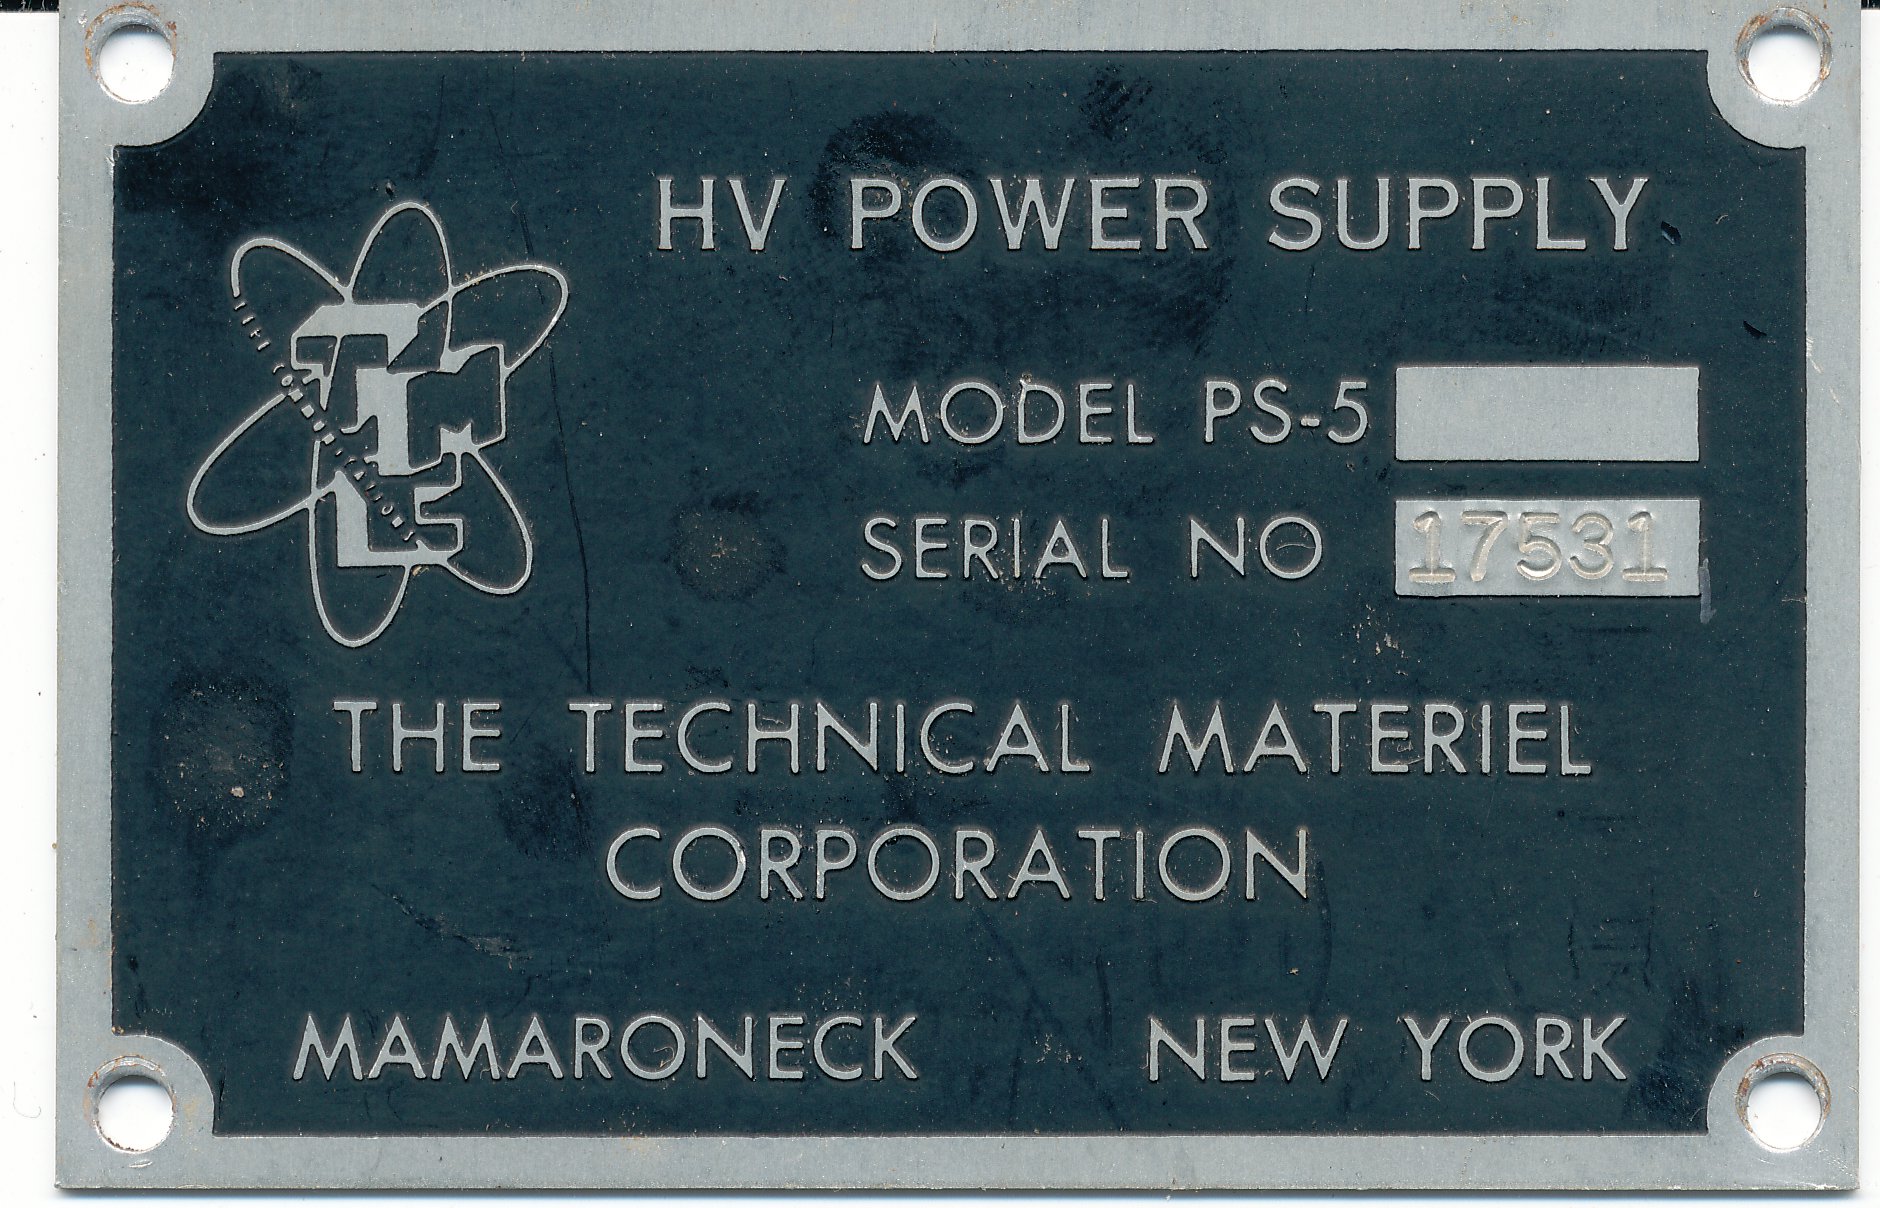
(As usual, this is a thumbnail--click on the image to get the full-resolution scan). The font that's used on this and almost all TMC tags is a very plain sans-serif font. It has some unusual characteristics, however, and these made it hard to find a digital font that's a good match.
If you go searching for sans-serif fonts on-line, you'll discover that there are literally thousands of them! There are a couple of ways you can search: first, you can take the image of the tag above (or any other TMC tag that you've scanned in) and find a match graphically. There are a number of websites that will examine an image of a font example, and come up with a close match. I found that indeed the match is pretty good, but.. there's a downside! These sites mainly want you to spend money on commercial fonts.. a LOT of money. A typical production quality font will run you around $75 or so, once you've download all the bells and whistles.
I found a number of fonts that are (a) free, and (b) a pretty decent match to the early TMC font. These include
Some places to look for free fonts:
Limit your search by specifying "sans-serif fonts" and use your chosen website's facility for typing in the text "MAMARONECK NY", which has most of the critical letters in it. I made the mistake of avoiding all fonts that weren't available in TrueType format, not realizing how easy it is to convert OTF and other formats into TTF. For your search, just find a good font,then worry about the conversion, which is easy!
I used Visio on a PC running Windows 7 to create the artwork for various tags. A Macintosh might have been a better choice of platform, perhaps using Omnigraffle as your graphics editor (I dearly wish MacDraw were still around!!).. And, Mac's seem to handle fonts more gracefully.. In any case, I'm using a PC for various obscure reasons, because I have to, in order to run the tools to maintain the TMCHistory website. There are various other PC tools you could use. It might be possible, though a bit clumsy, to use Gimp for artwork construction--it's really more of an image editing tool, but could probably be made to work for this purpose. You could even try PowerPoint, I guess... Visio isn't cheap, unfortunately.
The first order of business is to scan an example of the tag you want to reproduce. Scan either in B/W or color..probably doesn't matter which, at least at 300 dpi, and save the results somewhere. Assuming you've already downloaded a suitable font, and the white-on-black version of the TMC logo, you're ready to start.
If you're making a 1.5 x 2 or 2 x 3 tag, you can short-circuit many of the following steps by just downloading the Visio design files I made for my tags from the Tag Design Database Page. If you're starting from scratch:
There are probably dozens of companies in the US that will make a photo-etched aluminum tag for you. I'm recommending Aluma Photoplate because we've already 'scrubbed the pipe' with good results, they produce excellent work, and they're really nice to deal with. The company's website is:
http://www.alumaphoto-plateco.com/
The process you'll be using is called "Metalphot" and is a photo-anodized aluminum printing process. Tags are printed onto an 8" x 10" sheet, with as many copies of your artwork as will fit. So, for example, for a 2x3 tag, you get a minimum of 10 tags from the process. An 8x10 sheet costs $78, and there is a setup charge of $38. (These prices as of June 2015, so may be higher by the time you read this). Thus, tags are going to cost you about $10 each, and you pretty much have to buy 10 of them!
Aluma's webpage has a way to submit a job and get a quote. I would suggest, however, that you just communicate with Ken Wickman at the company directly. Ken is incredibly helpful, and very patient with endless questions.
You can reach him at ![]() or by phone at
1-866-579-9096. You'll need to mail him a description of what you want,
something like this:
or by phone at
1-866-579-9096. You'll need to mail him a description of what you want,
something like this:
Aluminum photo-etched tag 0.032" thick photo-anodized aluminum, white(clear) graphics on black background, satin finish, overall size: xx X yy inches. Mounting holes per attached drawing. Graphics per attached artwork JPEG. Quantity zz.
Email this and a request for a quote to Ken's address, and attach the artwork and your tag mechanical drawing. Turnaround is apparently about 3-4 weeks typically. You'll need to phone Ken at some point and give him a credit card number to charge the work to.